
Dart extensions, generating `copyWith` methods
Creating a code generation build step to automatically generate `copyWith` methods for us.

In this article, I'd like to take you on a little journey into the depths of Flutter and learn more about scheduling code execution. As a conversation starter, let's assume that we are building an application with a standard BLoC architecture, using the Provider library. To make this task challenging, upon opening a new screen we will have to initiate a network request to fetch something over the Internet. In this case, we have several options where to initiate our request:
BLoC, just before the screen presentation, when creating the BLoC itself or by using a coordinator object to start it for you. If you want to keep your architecture nice and tidy, this would be the recommended approach.The third option may not be the best in terms of architectural correctness, but is actually a fairly common approach in the Flutter world. Let's examine it, as it perfectly demonstrates our topic in a real-world scenario.
For demonstration purposes, here is a sample code. Notice anything wrong with it?
import 'package:flutter/material.dart';
import 'package:provider/provider.dart';

void main() {
  runApp(
    MaterialApp(
      title: 'Demo',
      home: ChangeNotifierProvider(
        create: (_) => MyHomePageBloc(),
        child: MyHomePage(),
      ),
    ),
  );
}

class MyHomePage extends StatefulWidget {
  MyHomePage({Key key}) : super(key: key);

  @override
  _MyHomePageState createState() => _MyHomePageState();
}

class _MyHomePageState extends State<MyHomePage> {
  @override
  void initState() {
    super.initState();

    context.read<MyHomePageBloc>().fetchData();
  }

  @override
  Widget build(BuildContext context) {
    final bloc = context.watch<MyHomePageBloc>();

    return Scaffold(
      appBar: AppBar(),
      body: Center(
        child: bloc.loading ? CircularProgressIndicator() : Text(bloc.data),
      ),
      floatingActionButton: FloatingActionButton(
        onPressed: () => context.read<MyHomePageBloc>().fetchData(),
        tooltip: 'Fetch',
        child: Icon(Icons.add),
      ),
    );
  }
}

class MyHomePageBloc with ChangeNotifier {
  String data = "Loading";
  bool loading = false;

  void fetchData() {
    loading = true;
    data = "Loading";
    notifyListeners();

    Future.delayed(Duration(seconds: 3), () {
      loading = false;
      data = "Done";
      notifyListeners();
    });
  }
}
At first glance, it may seem like everything is fine. However, if you run it, it will inevitably crash and you will see something similar in your logs: 'package:flutter/src/widgets/framework.dart': Failed assertion: line 4349 pos 12: '!_dirty': is not true.
This error indicates that we are trying to modify the widget tree at build time. The widget's initStatemethod is called in the middle of the build process, so any attempt to modify the widget tree from there will fail. In our case, when the fetch method is called, it synchronously executes notifyListeners(), which results in changes in the widget tree.
You may encounter a similar error when trying to do even more seemingly unrelated things. For example, showing a dialogue, which will also fail for a similar reason, because the context( Element) is not currently mounted in the widget tree yet.
Regardless of what you are trying to do, you must delay code execution until the build process is complete. In other words, you need to execute your code asynchronously. Now to our options.
By researching this topic on the internet, I've compiled a list of the most commonly recommended solutions. You can even find some additional options, but here are the most noticeable ones:
That's quite a number of options, you might say, and you'd be right. Speaking of our aforementioned problem, any of these will fix it. However, now that we are faced with such a variety of options, let's indulge our curiosity and try to understand the differences between them.
As you may know, Dart is a single-threaded system. Surprisingly enough, your application can do multiple things at once, or at least it looks that way. This is where the Event Loop comes into play. An Event Loop is literally an endless loop (
Run Loop for iOS developers) that executes scheduled events. The events (or just blocks of code, if you like) have to be lightweight, otherwise, your app will feel laggy or completely freeze. Each event, such as a button press or a network response, is scheduled in an events queue and waits to be picked up and executed by the Event Loop. This design pattern is
quite common
in UI and other systems that handle any kind of events. It might be difficult to explain this concept in a couple of sentences, so I would suggest reading
something
on the side if you are new to this subject. Don't overthink it, we are literally talking about a simple infinite loop and a list of tasks (blocks of code) scheduled for execution, one at a time, each iteration of the loop.
The special guest at the Dart Event Loop party we are about to learn is the
Microtask
. Our Event Loop has another queue inside, which is the Microtask Queue. The only thing to keep in mind about this queue is that all the tasks scheduled in it will be executed within a single iteration of the Event Loop before the event itself is executed.
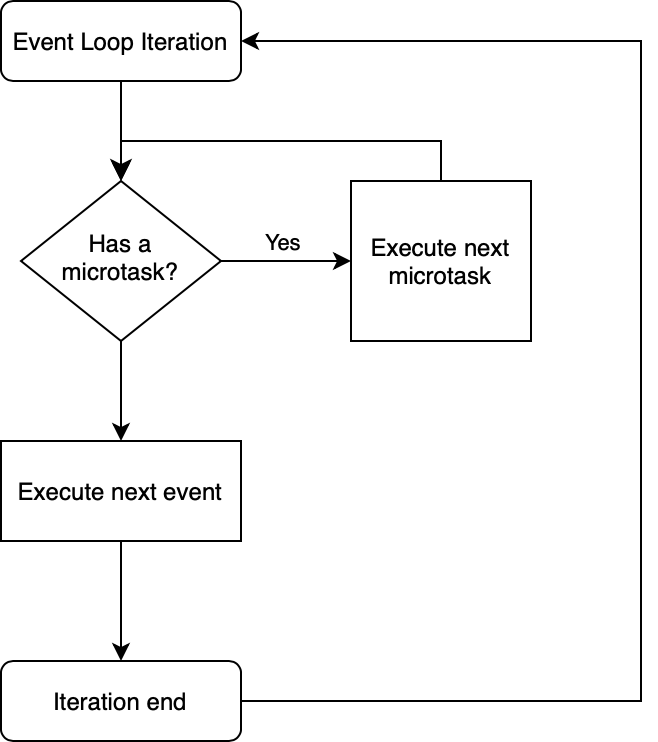
Each iteration first performs all the microtasks, followed by one event. Cycle repeats.
Unfortunately, there isn't much information on this subject, and the best explanation I've seen can be found in the web archive here or here.
Having this knowledge, let's take a look at all the options listed above and understand the way they work and the differences between them.
Anything that goes into the event queue. This is your default approach for scheduling an asynchronous task in Flutter. Scheduling an event we add it to the event queue to be picked up by the Event Loop. This approach is used by many Flutter mechanisms such as I/O, gesture events, timers, etc.
Timer is the foundation for asynchronous tasks in Flutter. It is used to schedule code execution in the event queue with or without a delay. The resulting fun fact is that if the queue is busy, your timer will never be executed, even if time is up.
Timer.run(() {
    print("Timer");
});
A well-known and widely used Dart
feature
. This may come as a surprise, but if you look under the hood, you will see nothing more than a wrapper of the aforementioned Timer.
Future<void>(() {
    print("Future Event");
});

Future<void>.delayed(Duration.zero, () {
    print("Future.delayed Event");
});
factory Future(FutureOr<T> computation()) {
  _Future<T> result = new _Future<T>();
  Timer.run(() {
    try {
      result._complete(computation());
    } catch (e, s) {
      _completeWithErrorCallback(result, e, s);
    }
  });
  return result;
}
As mentioned before, all scheduled microtasks are executed before the next scheduled event. It is recommended to avoid this queue unless it is absolutely necessary to execute code asynchronously, but before the next event from the event queue. You can also think of this queue as a queue of tasks that belong to the previous event, as they will be completed before the next event. Overloading this queue can completely freeze your application, since it must execute everything in this queue before it can proceed to the next iteration of its event queue, such as processing user input or even rendering the application itself. Nevertheless, here are our options:
As the name implies, schedules a block code in the microtask queue. Similar to the Timer, crashes the application if something goes wrong.
scheduleMicrotask(() {
    print("Microtask");
});
Similar to what we saw before, wraps our microtask in a try-catch block, returning the result of the execution or error in a nice and clean way.
Future<void>.microtask(() {
    print("Microtask");
});
factory Future.microtask(FutureOr<T> computation()) {
  _Future<T> result = new _Future<T>();
  scheduleMicrotask(() {
    try {
      result._complete(computation());
    } catch (e, s) {
      _completeWithErrorCallback(result, e, s);
    }
  });
  return result;
}
Whereas the previous two approaches involved a lower-level Event Loop mechanism, we are now moving to the Flutter domain. This callback is called when the rendering pipeline completes, so it is tied to the widget's lifecycle. When it's scheduled, it's called only once, not on every frame. Using the
addPostFrameCallback
method, you can schedule one or more callbacks to be called once the frame is built. All scheduled callbacks will be executed at the end of the frame in the same order in which they were added. By the time this callback is called, it is guaranteed that the widget-building process is complete. With some smoke and mirrors, you can even access the layout of the widget (
RenderBox), such as its size, and do other kinds of unrecommended hacks. The callback itself will run in the normal event queue that Flutter uses by default for almost everything.
This is a mixinresponsible for the drawing callbacks and implements this method we are interested in.
SchedulerBinding.instance.addPostFrameCallback((_) {
    print("SchedulerBinding");
});
I deliberately included this one as it is often mentioned along with
SchedulerBinding. It inherits this method from the SchedulerBinding and has additional methods unrelated to our topic. In general, it doesn't matter if you use the SchedulerBinding or the
WidgetsBinding, both will execute exactly the same code located in the SchedulerBinding.
WidgetsBinding.instance.addPostFrameCallback((_) {
    print("WidgetsBinding");
});
Since we have learned a lot of theory today, I strongly recommend playing with it for a while to make sure we get it right. We can use the following code in our previous initState and try to predict in which order it will be executed, which is not an easy task as it may seem.
SchedulerBinding.instance.addPostFrameCallback((_) {
  print("SchedulerBinding");
});

WidgetsBinding.instance.addPostFrameCallback((_) {
  print("WidgetsBinding");
});

Timer.run(() {
  print("Timer");
});

scheduleMicrotask(() {
  print("scheduleMicrotask");
});

Future<void>.microtask(() {
  print("Future Microtask");
});

Future<void>(() {
  print("Future");

  Future<void>.microtask(() {
    print("Microtask from Event");
  });
});

Future<void>.delayed(Duration.zero, () {
  print("Future.delayed");

  Future<void>.microtask(() {
    print("Microtask from Future.delayed");
  });
});
Now that we learned so many details, you can make a considered decision on how to schedule your code. As a rule of thumb, if you need your context or something related to Layout or UI, use addPostFrameCallback. In any other case, scheduling in a standard event queue with Future<T> or Future<T>.delayed should be enough. The microtask queue is something very niche that you'll probably never come across, but it's still worth knowing about. And, of course, if you have a heavy task, you're looking at creating an
Isolate, which as you might have guessed, will be communicated by the event queue. But that's a topic for another article. Thanks for your time and see you next time.
Creating a code generation build step to automatically generate `copyWith` methods for us.

React Native and Flutter comparison. How to choose the right platform.